| 0.1 Start the camera & double-click the Syncroscan start icon |
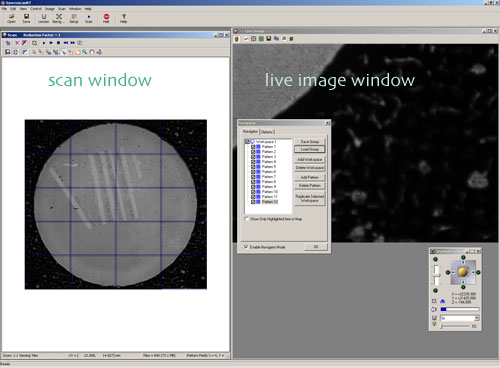
| 0.2 Syncroscan has two adjustable windows: Left = scan window, Right = live image |
 |
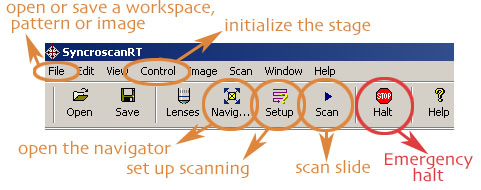
| 0.3 The basic top-level menu and icons |
 |
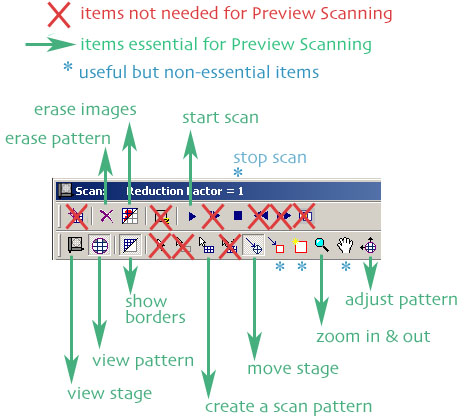
| 0.4 Scan window menu and icon items |
 |
|
| 0.5 Live-image window icon items |
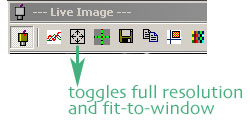 q qThe only tool of importance for the live window is the zoom toggle. |
| 0.6 Joystick control window |
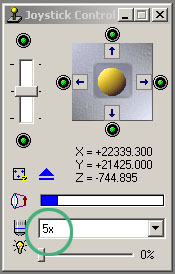 Make sure that the magnification setting droplist matches the actual nosepiece position. |
| PREVIEW SCANNING: Step 1 … Syncroscan Protocol Setup |
| 1 Turn microscope power supply ON. If alarm persists, turn power UP, then DOWN. |
| 2 Turn on camera. |
3 Start Syncroscan RT. If you get the error “No camera detected” then:
Also make sure Syncroscan RT isn’t already running, as Windows will try to launch another instance of the program but only one will work properly. |
| 4 Set nosepiece at the 5x & swing the condenser out. Achieve a clear field with prism (50 or 100%), grey filter & voltage as needed. Drop stage slightly with left knob. |
| 5 Select Controls → Stage → Init. This will initialize the stage (essential). Watch carefully as the stage moves to make sure it does not hit objectives. |
| 6 Place slide in stage clips, flush left. |
| 7 Test: Select File → Open Scan Pattern → spot_01.pat. Select the move button. Click anywhere in the pattern. The stage should drive to spot 01. If it does not, STOP. If it does, CONTINUE. Select spot_02.pat. If the stage drives correctly to both spots you may continue. |
| Preview Scanning: Step 2 … Scanning an Entire Slide |
| 2.1 After initialization (Step 1), select erase pattern and erase images. |
| 2.2 Adjust lighting as needed and focus the image in the Live image window. |
2.3 Select the Navigator.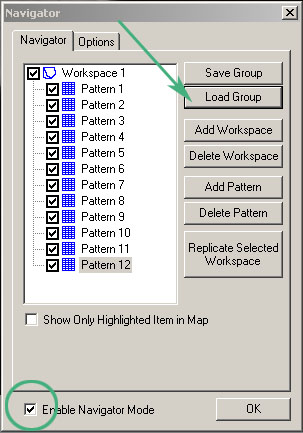 Make sure that the “Enable Navigator Mode” box is checked. Click “Load Group” and load 12_spot.oig. You should see 12 patterns listed. |
2.4 Select the Setup button to open the Setup dialog and follow these steps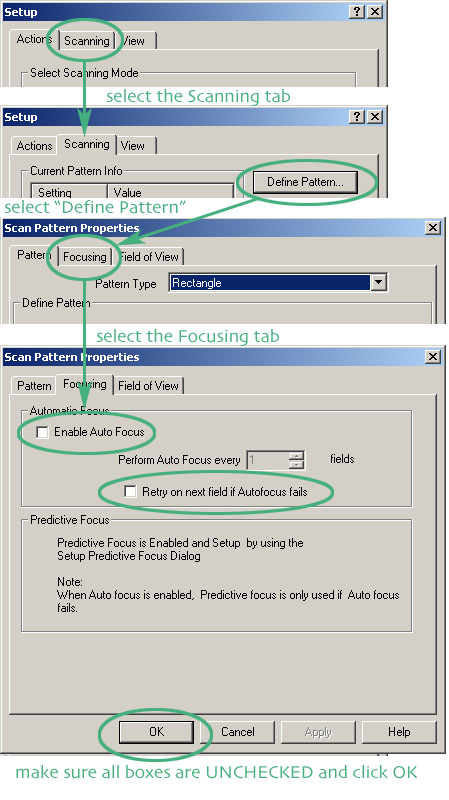 |
| 2.5 Select the Scan button, select “RT” and wait until all spots are scanned |
| 2.6 Select File → Save Workspace as… “filename.sws” in folder “Preview”. Use these filename rules
|
| Preview Scanning: Step 3 … Scanning a selected set of spots |
| 3.1 After initialization (Step 1), select erase pattern and erase images. |
| 3.2 Select view stage/b> and zoom in or out as needed |
| 3.3 Select File → Open Scan Pattern → spot_xx.pat, where xx=the number of the spot you wish to scan. |
| 3.4 Select the move button. Click anywhere in the pattern. The stage should drive there. If it does not, STOP. If it does, CONTINUE. |
| 3.5 Select view pattern button. Click in the first box and focus the Live image with the coarse left-hand focus. Adjust lighting if needed. |
| 3.6 Use Setup to make sure that “Enable Auto Focus” is unchecked: OFF. |
| 3.7 Select Scan and |
| 3.8 When scanning is done, use create a scan pattern around the area you wish to capture. |
| 3.9 Use move stage to position the cursor somewhere in the image for focusing |
| 3.10 Switch the condenser in, switch the mag to 10x, adjust lighting and focus |
| 3.10 Make sure the Joystick control window is set at 10x |
| 3.11 Use Setup to make sure that “Enable Auto Focus” is checked: ON. |
| 3.12 Use move stage to position the cursor in box 1 (upper left) |
| 3.13 Focus |
| 3.14 Select Scan in the normal (not RT) mode |
| 3.15 Select File → Save Workspace as… “filename.sws” in folder “Preview”. Use these filename rules
|